Source Guide: Microsoft 365
This source guide describes the process for configuring Microsoft 365 to send DMARC-compliant messages. You will need to configure this source, and others that send on your behalf, before advancing your DMARC policies to a more restrictive state (eg. quarantine and/or reject).
To bring this source into DMARC compliance, you will need access to Microsoft 365’s administrative account and the domain’s DNS management console.
From time to time, these instructions change with very little advance notice. Please always refer to documentation published by Microsoft 365 for the most complete and accurate information.
General information
Microsoft 365 provides cloud-based mailbox email service, as well as a suite of tools and utilities. It is likely managed by IT and utilized by all departments in your organization. Microsoft 365 supports DMARC compliance through SPF and DKIM alignment.
SPF
To configure SPF, add the following entry to your sending domain’s SPF record:
For Exchange online (common), add: include:spf.protection.outlook.com
For Exchange Online dedicated only (not common), add:
- ip4:23.103.224.0/19
- ip4:206.191.224.0/19
- ip4:40.103.0.0/16
- include:spf.protection.outlook.com
For Microsoft 365 Germany, Microsoft Cloud Germany only (not common), add: include:spf.protection.outlook.de
Reference: Microsoft 365’s SPF instructions
DKIM
There are two ways to enable DKIM for Microsoft 365: from within the user interface (UI) or using PowerShell.
To configure DKIM:
- Determine sending domain to enable DKIM signing (example.com)
- Retrieve DNS (CNAME) records to publish
- Publish CNAME records to DNS zone of sending domain
- Confirm published DNS records have propagated
- Enable DKIM signing (from UI or via Powershell)
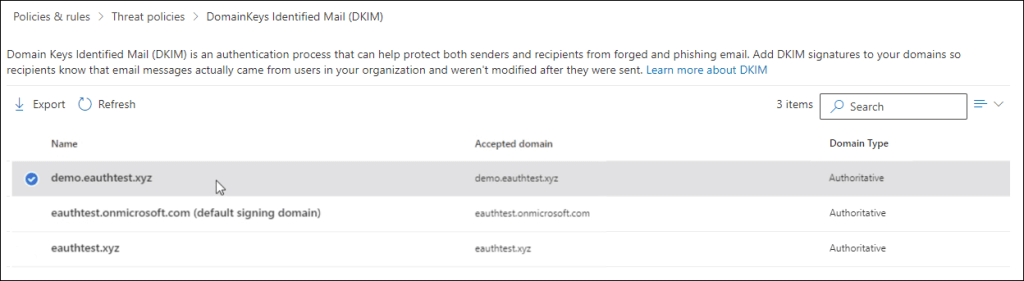
Method 1: Microsoft UI
Step 1: Click on the domain you wish to configure DKIM on the DKIM page (https://security.microsoft.com/dkimv2 or https://protection.office.com/dkimv2).
Step 2: Slide the toggle to Enable. You will see a pop-up window stating that you need to add CNAME records.
Step 3: Copy the CNAMEs shown in the pop up window
Step 4: Publish the copied CNAME records to your DNS service provider. On your DNS provider’s website, add CNAME records for DKIM that you want to enable. Make sure that the fields are set to the following values for each:
Record Type: CNAME (Alias)
Host: Paste the values you copy from DKIM popup.
Points to address: Copy the value from DKIM popup.
TTL: 3600 (or your provider default)
Step 5: Return to the DKIM page to enable DKIM.
If you still see the “Client Error CNAME record doesn’t exist” error, it might be due to synchronization with the DNS server, which might take seconds to hours to resolve. If the problem persists, repeat the steps again and check for any copy/paste errors, like additional spaces or tabs.
Method 2: PowerShell
Step 1: Connect to Exchange Online PowerShell
Step 2: Run the following commands in Exchange Online PowerShell to create the selector records:
New-DkimSigningConfig -DomainName <domain> -Enabled $false
Get-DkimSigningConfig -Identity <domain> | Format-List Selector1CNAME, Selector2CNAME
If you have provisioned custom domains in addition to the initial domain in Microsoft 365, you must publish two CNAME records for each additional domain. For example, if you have two domains, you must publish two additional CNAME records, and so on.
Step 3: Use the following format for the CNAME records:
Host name: selector1._domainkey
Points to address or value: selector1-<customDomainIdentifier>._domainkey.<initialDomain>
TTL: 3600
Host name: selector2._domainkey
Points to address or value: selector2-<customDomainIdentifier>._domainkey.<initialDomain>
TTL: 3600
Example:
Host name: selector1._domainkey
Points to address or value: selector1-example-com._domainkey.example.onmicrosoft.com
TTL: 3600
Host name: selector2._domainkey
Points to address or value: selector2-example-com._domainkey.example.onmicrosoft.com
TTL: 3600
For Microsoft 365, the selectors will always be “selector1” or “selector2”
customDomainIdentifier is the same as the customDomainIdentifier in the customized MX record for your custom domain that appears before mail.protection.outlook.com. For example, in the following MX record for the domain contoso.com, the customDomainIdentifier is contoso-com:
contoso.com. 3600 IN MX 5 contoso-com.mail.protection.outlook.com
initialDomain is the domain that you used when you signed up for Microsoft 365. Initial domains always end in onmicrosoft.com.
Note: It’s important to create the second record, but only one of the selectors may be available at the time of creation. In essence, the second selector might point to an address that hasn’t been created yet. We still recommend that you create the second CNAME record, so your key rotation will be seamless.
Step 4: Once you have published the CNAME records in DNS, you are ready to enable DKIM signing through Microsoft 365. You can do this either through the Microsoft 365 admin center or by using PowerShell.
Use the following PowerShell syntax:
Set-DkimSigningConfig -Identity <Domain> -Enabled $true
Example:
Set-DkimSigningConfig -Identity example.com -Enabled $true
Reference: Microsoft 365’s DKIM instructions
If you have a dmarcian account, it may take a few days to see these changes reflected in the dmarcian platform. You can look in the Detail Viewer (shown below) to check SPF and DKIM alignment required for DMARC.

We’re Here to Help
With a team of email security experts and a mission of making email and the internet more trustworthy through domain security, dmarcian is here to help assess an organization’s domain catalog and implement and manage DMARC for the long haul.
Want to continue the conversation? Head over to the dmarcian Forum.